Final Image Preview
Below is the final icon we'll be working towards.
Step 1
Create a new letter sized document. Use the Rectangle Tool (M) and create a rectangle 190 px wide by 150 px tall.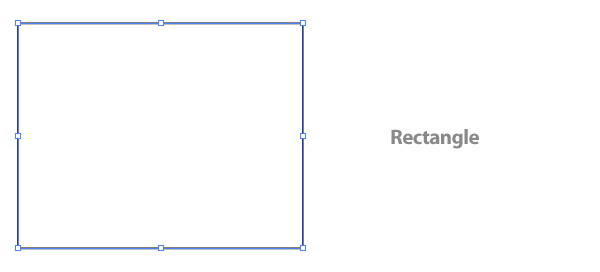
Step 2
With the rectangle selected go to Object > Path > Offset Path to bring up the Offset dialog. Change the Offset to 16 px.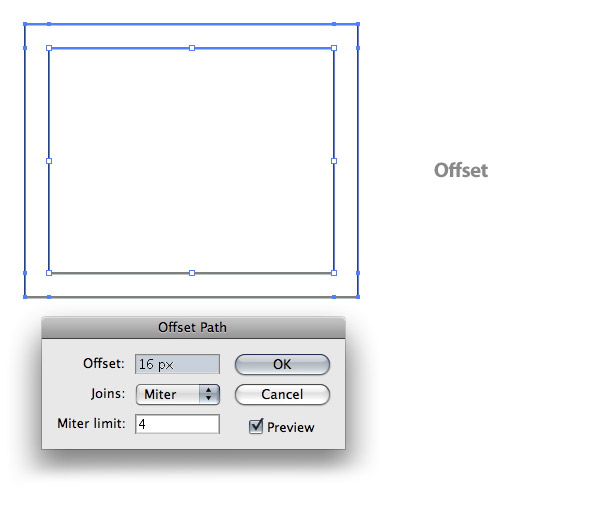
Step 3
Select both rectangles and go to Filter > Stylize > Rounds Corner, then change the radius to 8px.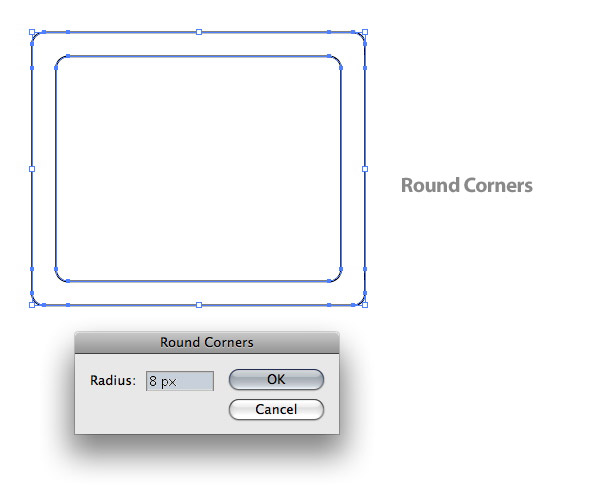
Step 4
Fill the larger rectangle with a Linear Gradient from the Gradient Panel. Change the first swatch on the Gradient Slider to a 50% black and the second swatch to a 80% black.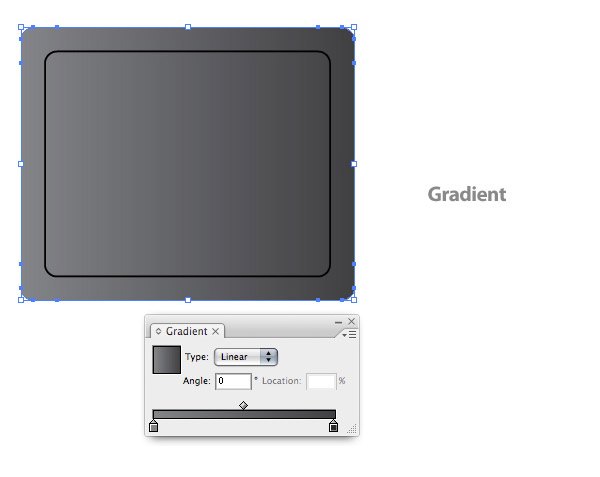
Step 5
Copy (Command + C) the smaller rectangle and Paste it in Front (Command + F). Next, use the Ellipse Tool (L) and create an ellipse that is 385 px wide by 230 px tall. Place the bottom of the ellipse halfway vertically over the rectangles.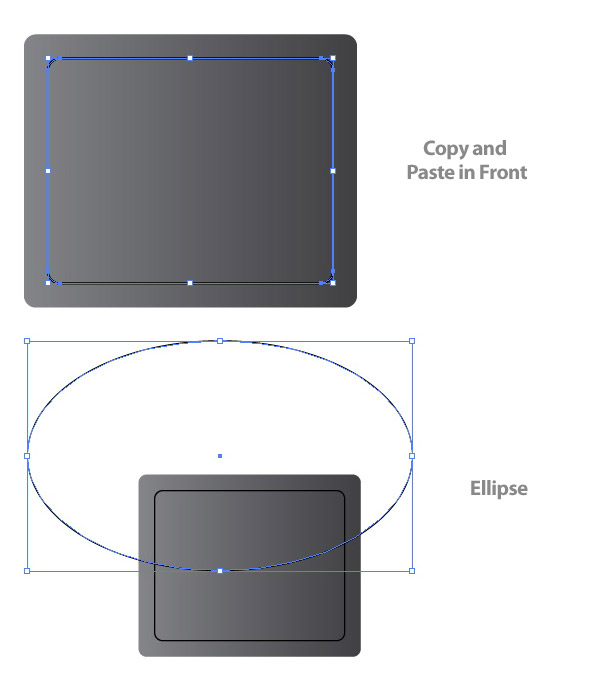
Step 6
Select one of the copied smaller rectangles and the ellipse, then press the Intersect Shape Areas from the Pathfinder Panel. Press the Expand button from the Pathfinder Panel after you have intersected the shapes.
Step 7
Select the non-intersected smaller rectangle and create a Linear Blend. Change the first swatch to a light cyan color and the second swatch to a cyan color. Use the Gradient Tool (G) and adjust the gradient by clicking and dragging from the top of the shape to the middle so the lighter color is at the top of the shape.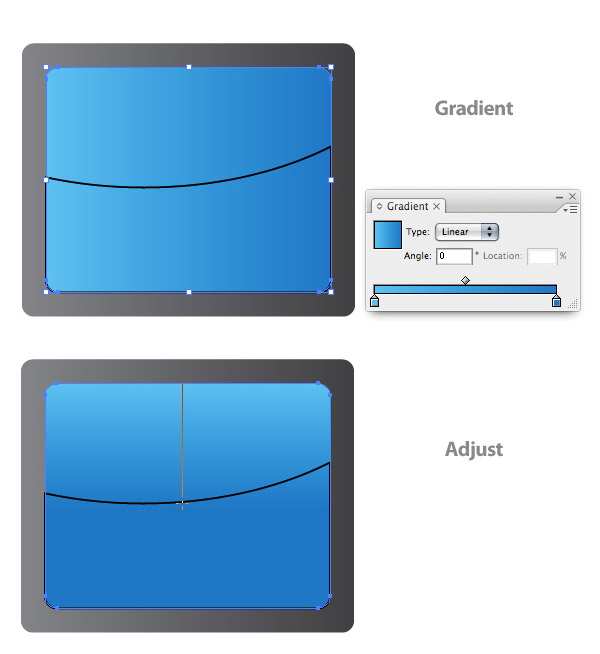
Step 8
Select to offset shape and fill with a Linear Blend. Change the first swatch to your cyan color and the second color to a darker cyan color. Adjust the gradient so the darker color is at the top of the offset shape.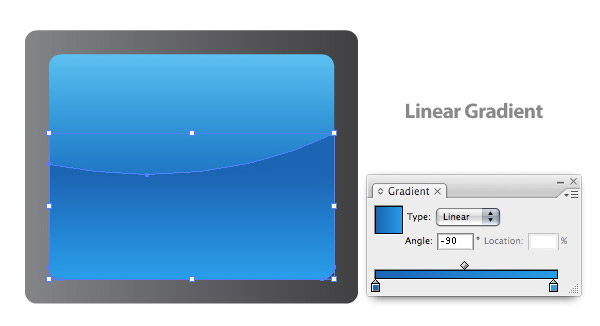
Step 9
Select the bigger rectangle and the smaller one (not the offset) and offset the paths at 2 px. Change the fill of these offsets to a Linear Gradient. Change the first swatch to a 75% black and the second swatch to a 90% black. Adjust the gradient so the lighter side of the gradient is on the right side of the offsets.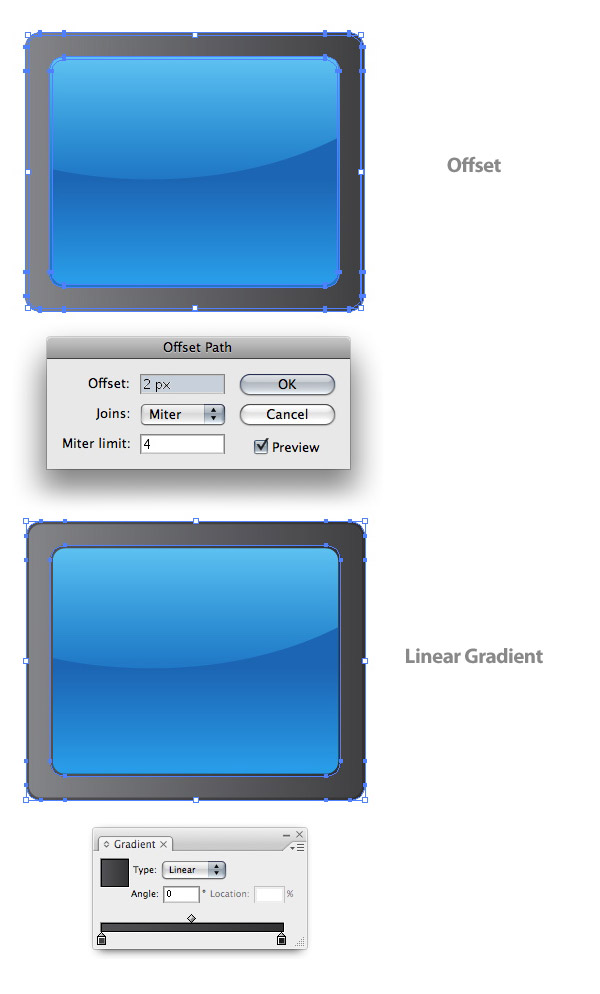
Step 10
Next we are going to start creating the clap at the top of the film slate. Start by creating a 240 px by 28 px rectangle.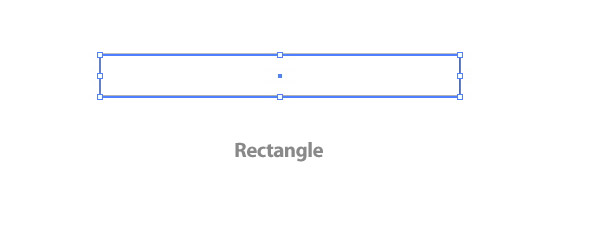
Step 11
Fill the rectangle with a Linear Gradient. Add a swatch to the gradient by clicking right below the Gradient Slider. Change the first swatch to a 20% black, the second swatch to white, and the last swatch to a 20% black. Select the middle white swatch on the Gradient Slider and change the Location in the Gradient Panel to 8. Next adjust the gradient so the two colors closest to each other are at the top of the rectangle.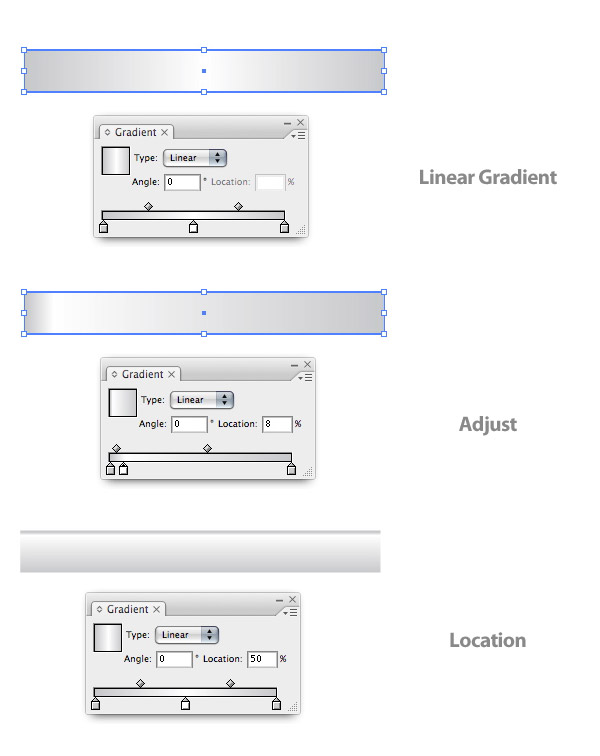
Step 12
Draw a rectangle that is 16 px wide by 64 px tall. Hover over the top-right corner of the rectangle with the Selection Tool (V) until you get the arrow options to rotate. When you do, hold Shift and rotate the rectangle 45 degrees, then place it over the left side of the previous rectangle.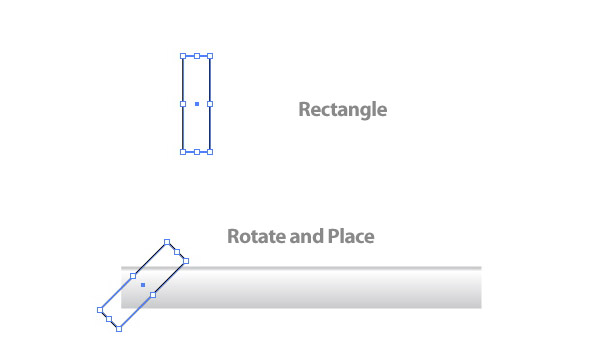
Step 13
Select the rotated rectangle with the Selection Tool (V), hold down Shift, and Alt-drag a copy to the right side.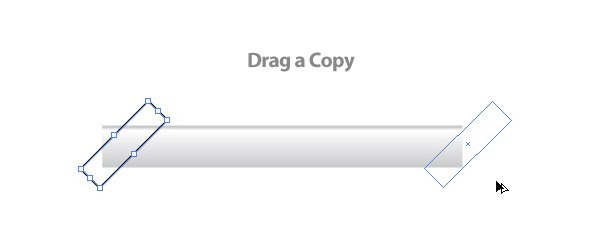
Step 14
Select both rectangles and go Object > Blend > Make to create a blend. You want three copies in the blend. I was lucky and three was the default when I created the blend. If you are not so lucky, go to Object > Blend > Blend Options and choose Specified Steps from the drop-down menu. Here you can change the number of steps to 3. Once you have the correct number of steps, go to Object > Expand to expand the blend.
Step 15
Copy (Command + C) the horizontal rectangle and Paste it in Front (Command + F). With the stepped rectangle and the copied rectangle selected, press the Intersect Shape Areas from the Pathfinder Panel, and then press Expand.
Step 16
Fill the stepped bars to a four swatch Linear Gradient. Change the first swatch to a 100% black, the second swatch to a 75% black, the third swatch to a 85% black, and the fourth swatch to a 63% black. Change the location of the second swatch to 13 and for the third swatch 47. Adjust the gradient so the darkest swatch is at the top of the stepped shapes.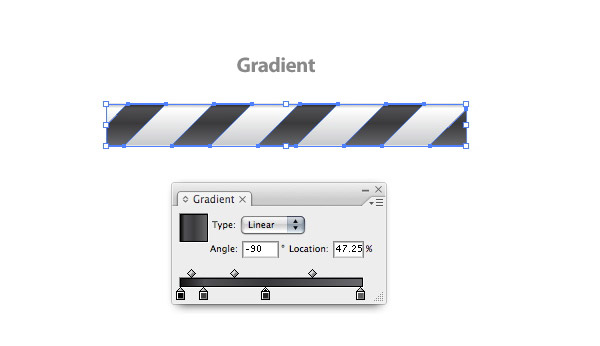
Step 17
Select the stepped shapes and rectangle, then drag out a copy above the original. With the copy still selected, choose Flip Horizontal from the pop-up menu of the Transform Panel. Next, rotate the copied bar 10 degrees in the Transform Panel, then line up the corner of both bars.Step 18
Select the Star Tool from the Tools Panel and click on the artboard to bring up the Star dialog. Change the Radius 1 to 30 px, Radius 2 to 15 px, and Points to 3. Next, Rotate the star 90 degrees to the right.Step 19
Round the corners of the triangle shape to 8 px and scale down to 36 px wide by 41 px high.Step 20
Copy (Command + C) the triangle rectangle and Paste it in Front (Command + F). Create an ellipse that is 60 px wide by 52 px high. Place it over the triangle so the bottom is in the middle of the triangle. Select the copied triangle and the ellipse, then intersect the shapes.Step 21
Select the offset triangle shape and fill it with a Linear Gradient. Change the first swatch to a light grey blue color and the second swatch to a blue grey color. Adjust the gradient so the lighter color is on top. Change the triangle shape to a Linear Gradient. Change the first swatch to your grey blue color and the second swatch to a dark grey blue color. Adjust the gradient so the darker part is at the top of the triangle shape.Step 22
Create a small ellipse that is 5 px by 5 px and fill it with a Linear gradient. Change the first swatch to your light blue color and the second swatch to a dark grey blue color. Adjust the gradient so the lighter part is at the top of the ellipse. With the ellipse selected, Offset the path by 1 px, then adjust the gradient of the offset path so the darker color is at the top of the offset ellipse.Step 23
Place the ellipse over the top left side of the triangle shape. Drag out a copy of the ellipse to the bottom left of the triangle.Step 24
Place the completed triangle over the slat clamps you created earlier.Step 25
Once placed, select the original triangle shape and drag down a copy. Change the color of the copy to an 80% black and send it behind the original triangle. With the Selection Tool (V), squish the copied triangle to the left until the right side of it hides under the original triangle.Step 26
Select all the top film slate artwork and place over the body of the film slate.Step 27
Now we can add some text to the blue area on the film slate. For the font I used Georgia for the capital V and Helvetica Light for the text at the bottom. Type whatever you want in any font you want, place it, and outline the text by going to Type > Create Outlines.Step 28
To add a little more pizzazz to the type, Copy (Command + C) the blue offset shape and Paste it in Front (Command + F), then Copy (Command + C) the text overlapping the blue offset shape and Paste it in Front (Command + F) as well. Select both copies and Intersect them. Change the fill of the shape to a Linear Gradient with the first swatch white and the second swatch a very light blue. Adjust the gradient so the darker color is at the top of the intersected shape.Step 29
Now the film slate is done we can start to add some depth to it. Start by grouping all the artwork together by selecting all the artwork and going to Object > Group (Command + G).Step 30
For this next step we are going to use Free Distort to give the slate a little perspective. Select your artwork and open up the Free Distort dialog by going to Effect > Distort & Transform > Free Distort. When the dialog is up, take the top-right anchor point and move it slightly to the left and down. Take the top-left anchor point and move it to the right and down, very slightly. Once you're done Expand the effect. Take a look at the image below to get a better idea. It might look a little weird right now, but trust me, it will look a whole lot better soon.Step 31
Select the film slate and rotate it 10 degrees in the Transform Panel.Step 32
Ungroup the object by going Object > Ungroup (Command + Shift + G).Step 33
Select the largest rounded rectangle path in the film slate body and use the Selection Tool (V) to stretch it down slightly. Change the Linear Gradient to a 3 swatch gradient with the outer swatches an 80% black and the inside swatch a 30% black.Step 34
Copy (Command + C) the stretched shape and Paste it in Back (Command + B). Stretch this shape down and slightly to the left, then change the middle gradient swatch to a 50% black.Step 35
Select the bottom white clamp shape and drag down a copy, then change to a two swatch gradient with the first swatch a 80% black and the second swatch a 100% black. Send the copied shape behind the original and adjust the gradient so the darkest part is at the top of the shape.Step 36
With the Direct Selection Tool, select the bottom right anchor point and move it left to the body of the film slate. When you do this try to keep the original angle. Next, adjust the top right anchor point with the bottom right point of the original shape you copied this one from. Adjust the bottom left point to the body and adjust the top left anchor point to the bottom point of the original shape. Look at the images below if this seem confusing.Step 37
Drag out a copy of the top clamp as before, but move the copy more to the left and down than previously. Change the gradient to the same dark four swatch gradient in the clamps. Also, adjust the anchor points as before.Step 38
Select all the artwork, then Copy (Command + C) and Paste (Command + V). With all the copied artwork selected, press the Add To Shape Area button in the Pathfinder Panel, then press Expand.Step 39
Change the color of the new object to a 30% black. Next, Offset the path 4 px and change the color to white.Step 40
Select both shapes and create a blend by going Object > Blend > Make. Next, place the blend behind all the other artwork. Place the blend slightly to the left behind the film slate, creating a drop shadow. All Done!Final Image
Let's take another look at the final image below.


0 Comments::
Post a Comment