Final Image Preview
Before we get started, let's take a look at the image we'll be creating. Want access to full PSD files and downloadable copies of every tutorial, including this one? Join PSDTUTS PLUS for just $9/month. You can view the final image preview below or view a larger version here.
Step 1
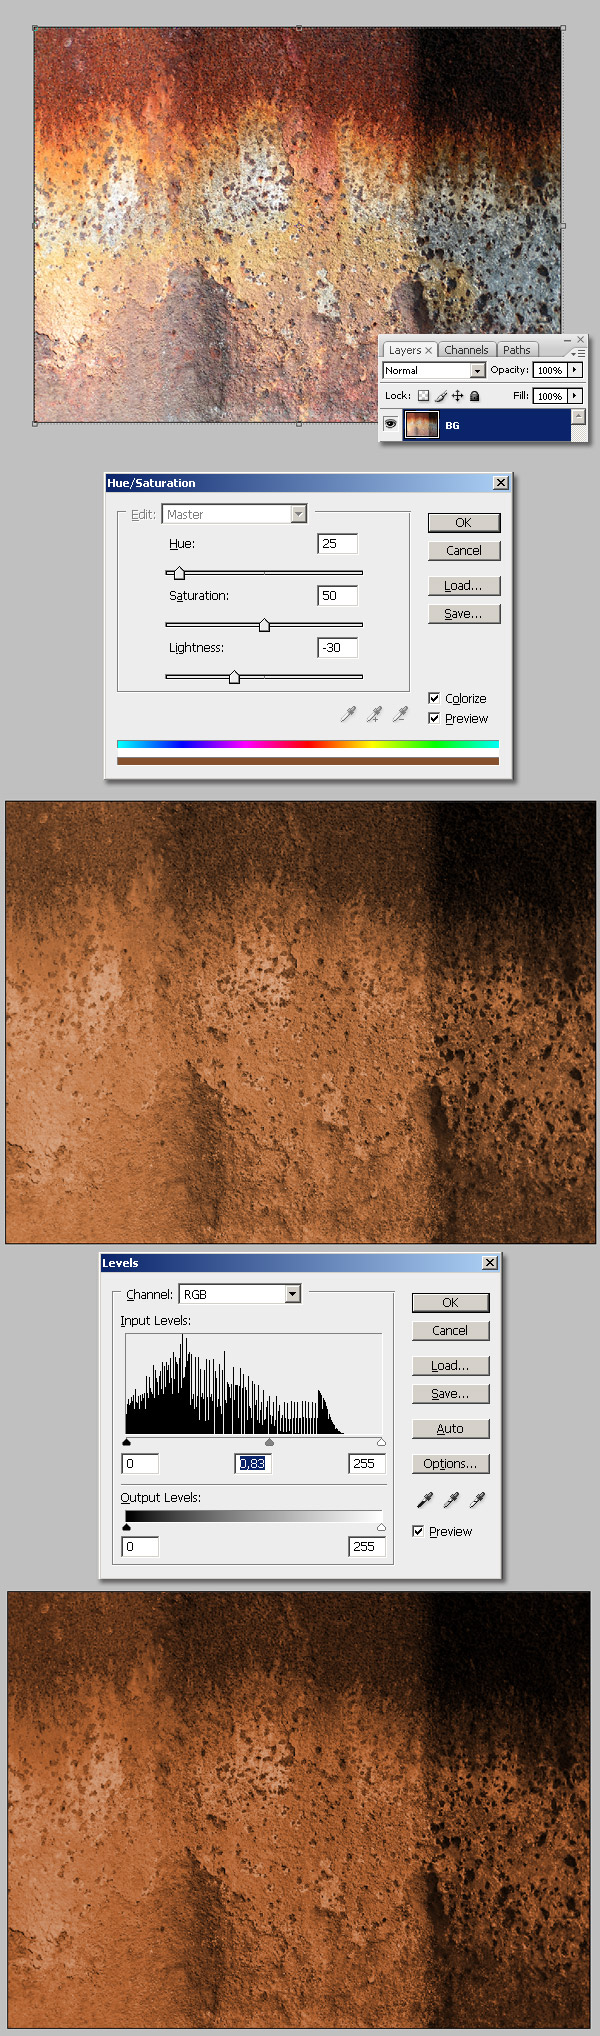
Copper is a wonderful metal. It's strong and resistant but easy to handle. Besides, copper is great when you're designing grunge and old-style graphics or websites. So here's a simple and quick way to add this particular effect to your text and shapes.First, create a new black document, 1024 pixels by 768 pixels this time. Then decide where you're going to put your text in. I've found this image of a ruined wall, and after adjusting the Hue/Saturation (Command + U), and Levels (Command + L) using the values of the image below, our background is ready.
Step 2
Since the copper has green tones when it gets old (like the Statue of Liberty in New York, USA). We'll need to add some green details here and there, Create a new layer and set this color (#1A3404) as the foreground, then using a medium size soft brush draw some spots. Next, change the "Green Spots" layer Blending Mode to Color Dodge.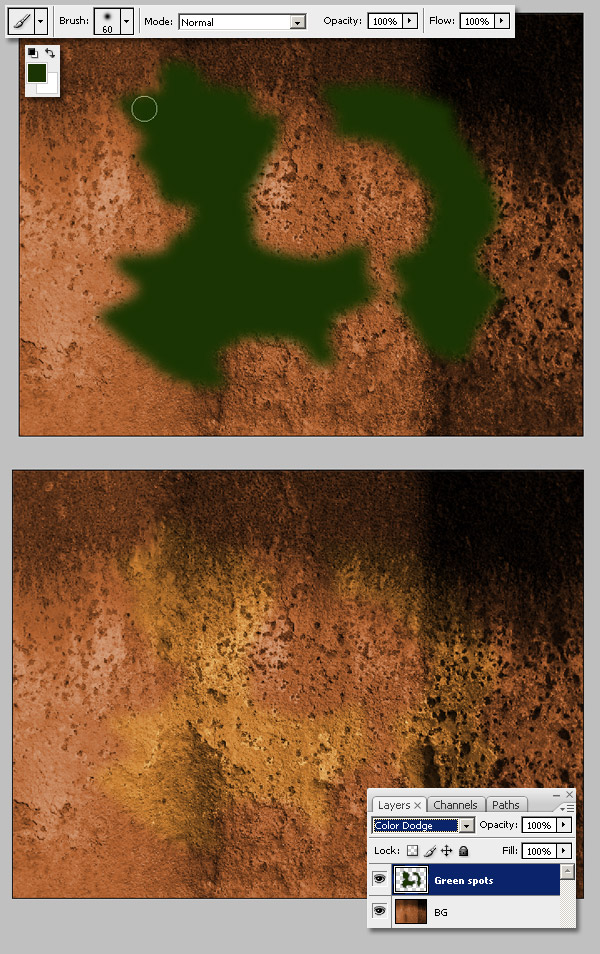
Step 3
Press Command + A to select all, then Command + Option + D to Feather the selection 50px.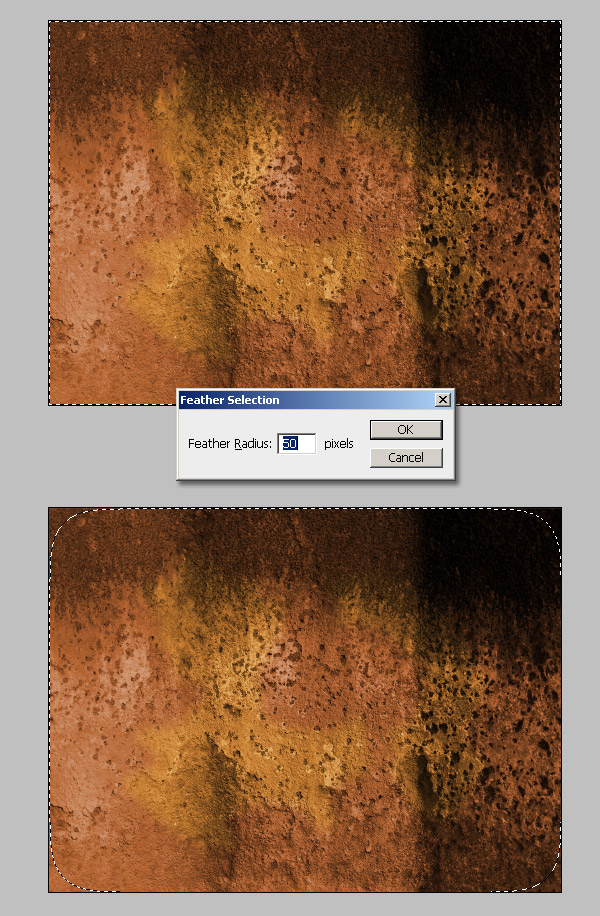
Step 4
Fill the selection with black (#000000) into a new layer called "Frame." Then go to Filter > Distort > Wave, and set the Max Wave length to 370.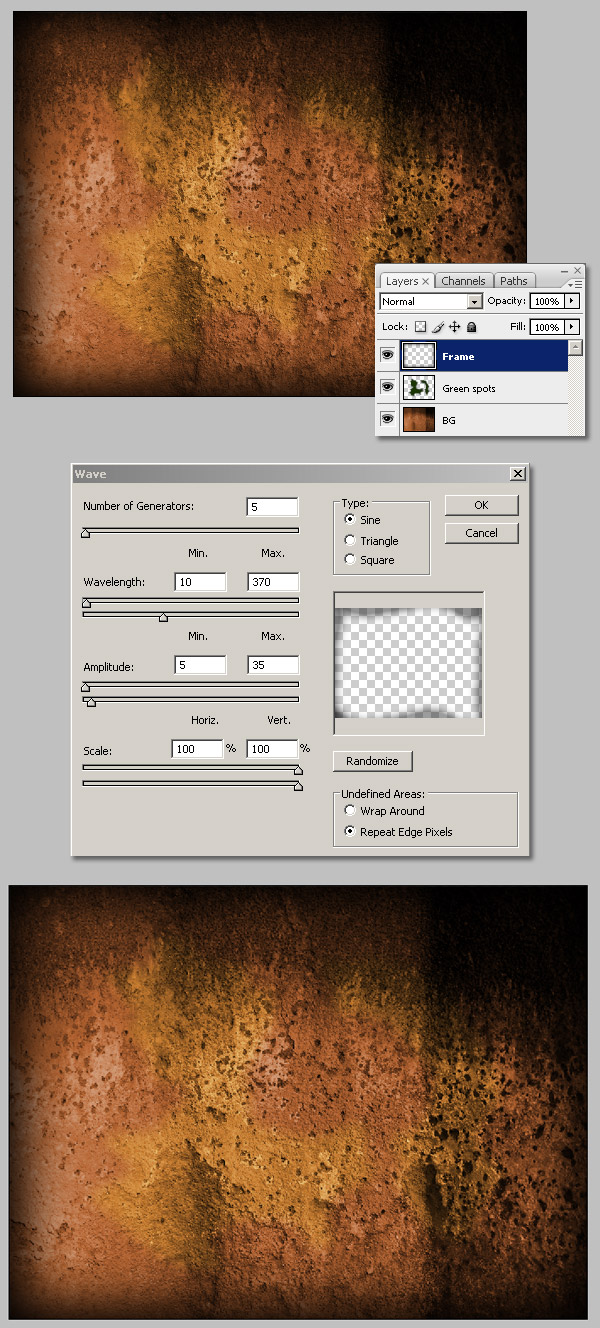
Step 5
Now create a new layer, name it "Light" and fill it with a White to Black (#FFFFFF to #000000) Reflected Gradient. Then go to Image > Adjustments > Curves (Command + M) and set the curves just like it shows in the image below. Finally, change the "Light" layer Blending mode to Overlay. Keep this layer always above all others in the layers palette.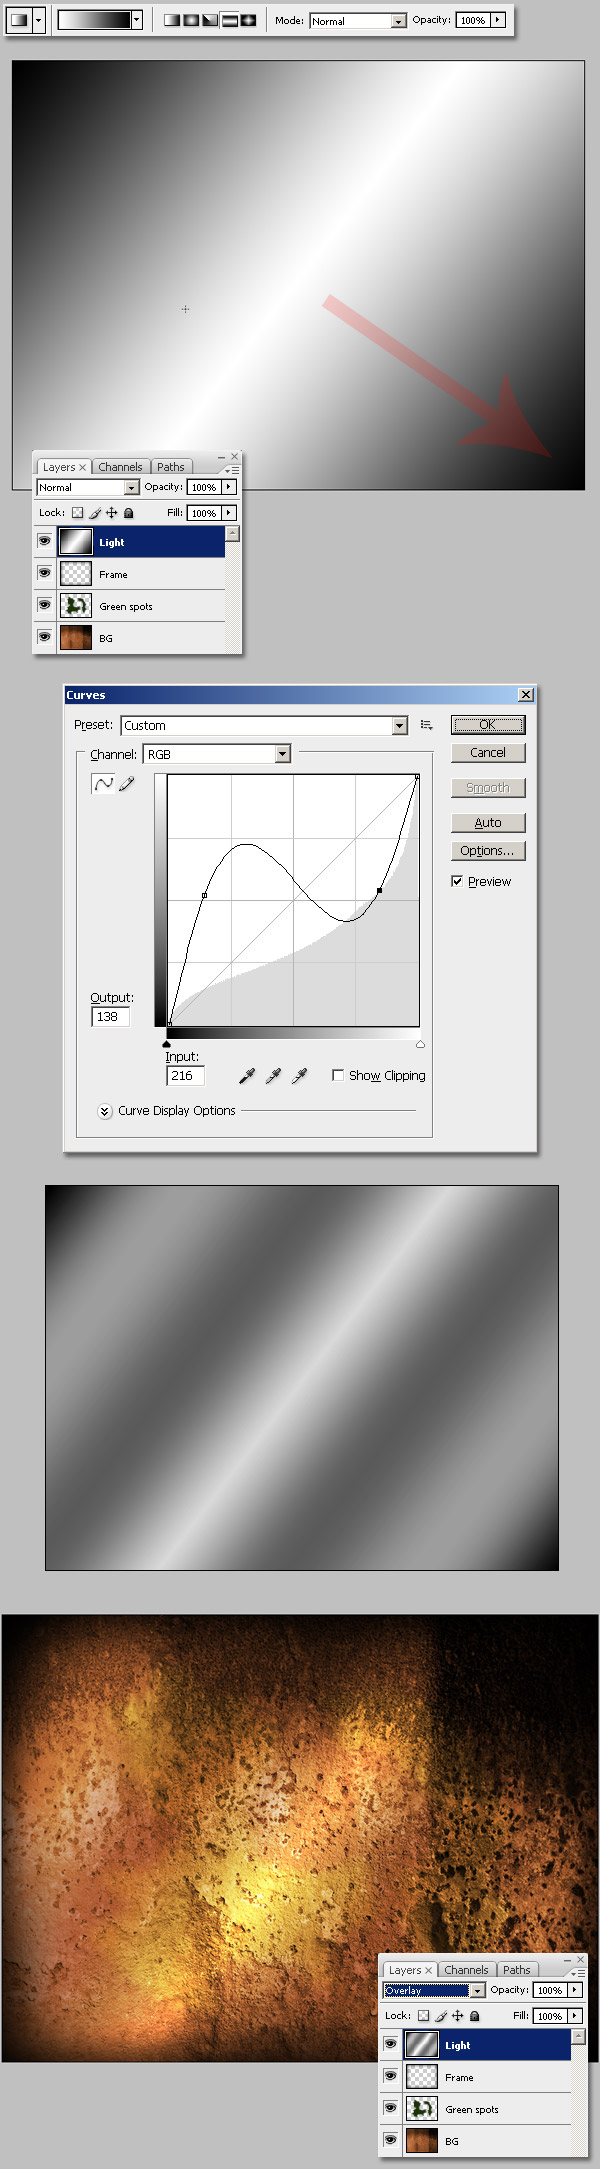
Step 6
Now begins the fun part! Write your text, I'm using Rockwell typeface, but you can use any other.
Step 7
Now let's look at the creative flow of making a layer style. A good point to start is adding a Gradient Overlay matching the scene lightening. In this case add a five colors gradient (#000000, #160700, #783501, #421F01, and #050505) and an Angle of 140º. Also, add a 5 pixels Gradient Stroke effect using five colors (#803C17, #A44F30, #52230F, #52230F, and #381408) Angle: -95º.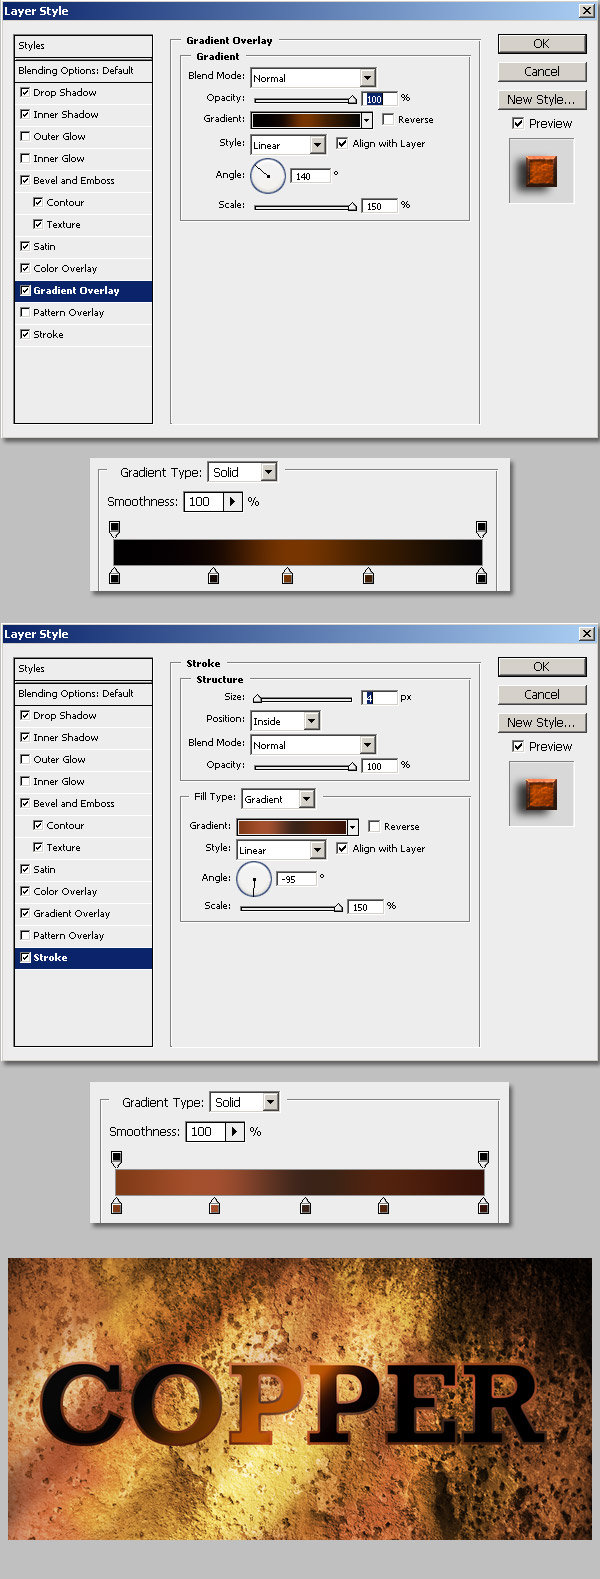
Step 8
Now add the shadows, first an Inner Shadow, then a Drop Shadow, take special care with the Blending Modes of every Style. Both shadows must be in Multiply mode.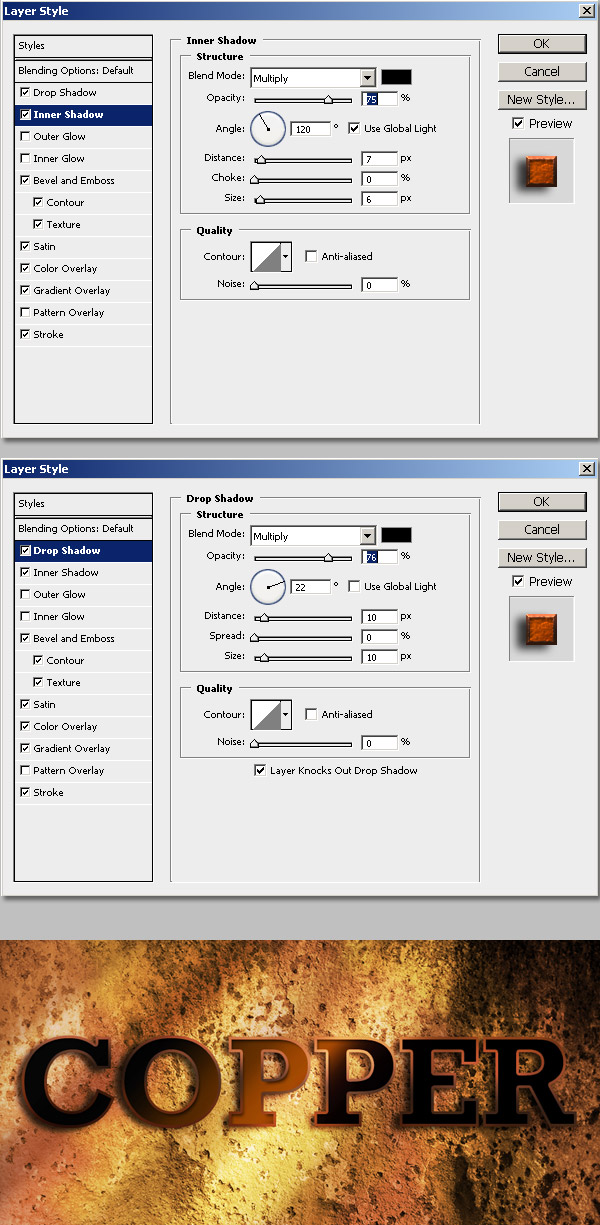
Step 9
Next add a Color Overlay effect (#742901), but set the Blend mode to Linear Dodge (Add). Then add a dimmed (Opacity 16%) Satin effect.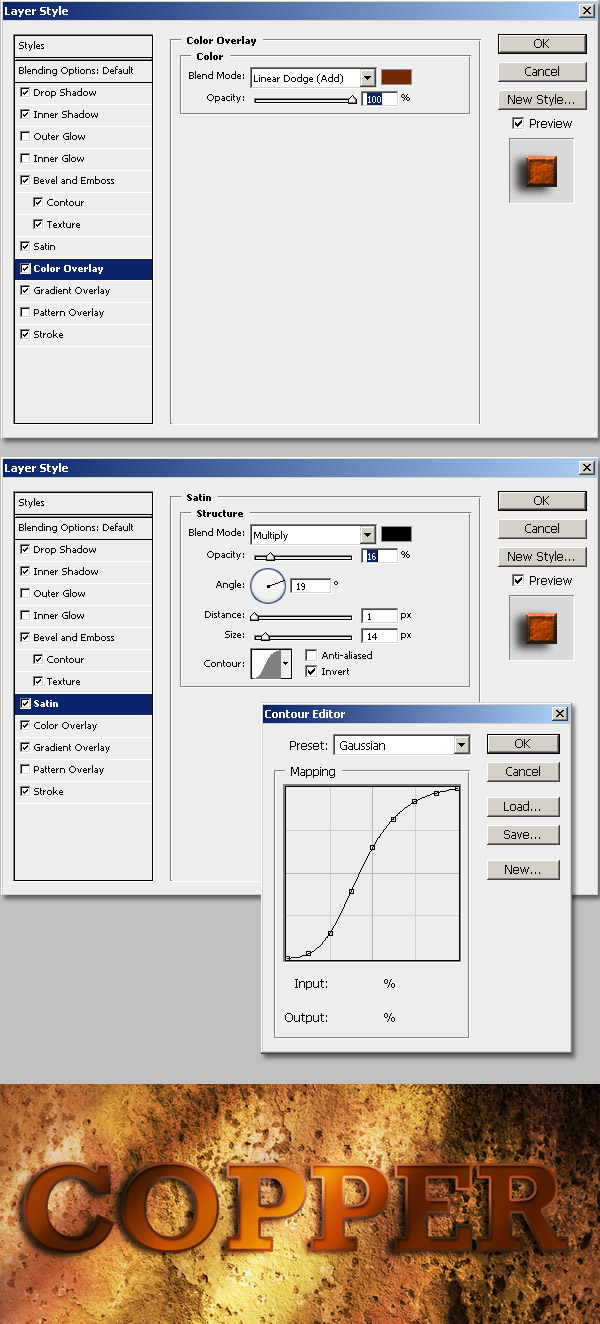
Step 10
This Step may be the most important one in this tutorial process. Add a Bevel and Emboss Style, Set the Style to Inner Bevel and Technique to Chisel Hard, this way you'll get a sharpen bevel. Set all the values as shown below. Increase the Depth mode to maybe 715% and notice the changes to both Highlight and Shadow modes.Once you add the basic Bevel style, mark the Contour checkbox and set a Gaussian Contour with a Range of 50%. Finally, mark the Texture checkbox and then set the "Rusted Metal" texture loading the default Photoshop CS3 Patterns library.
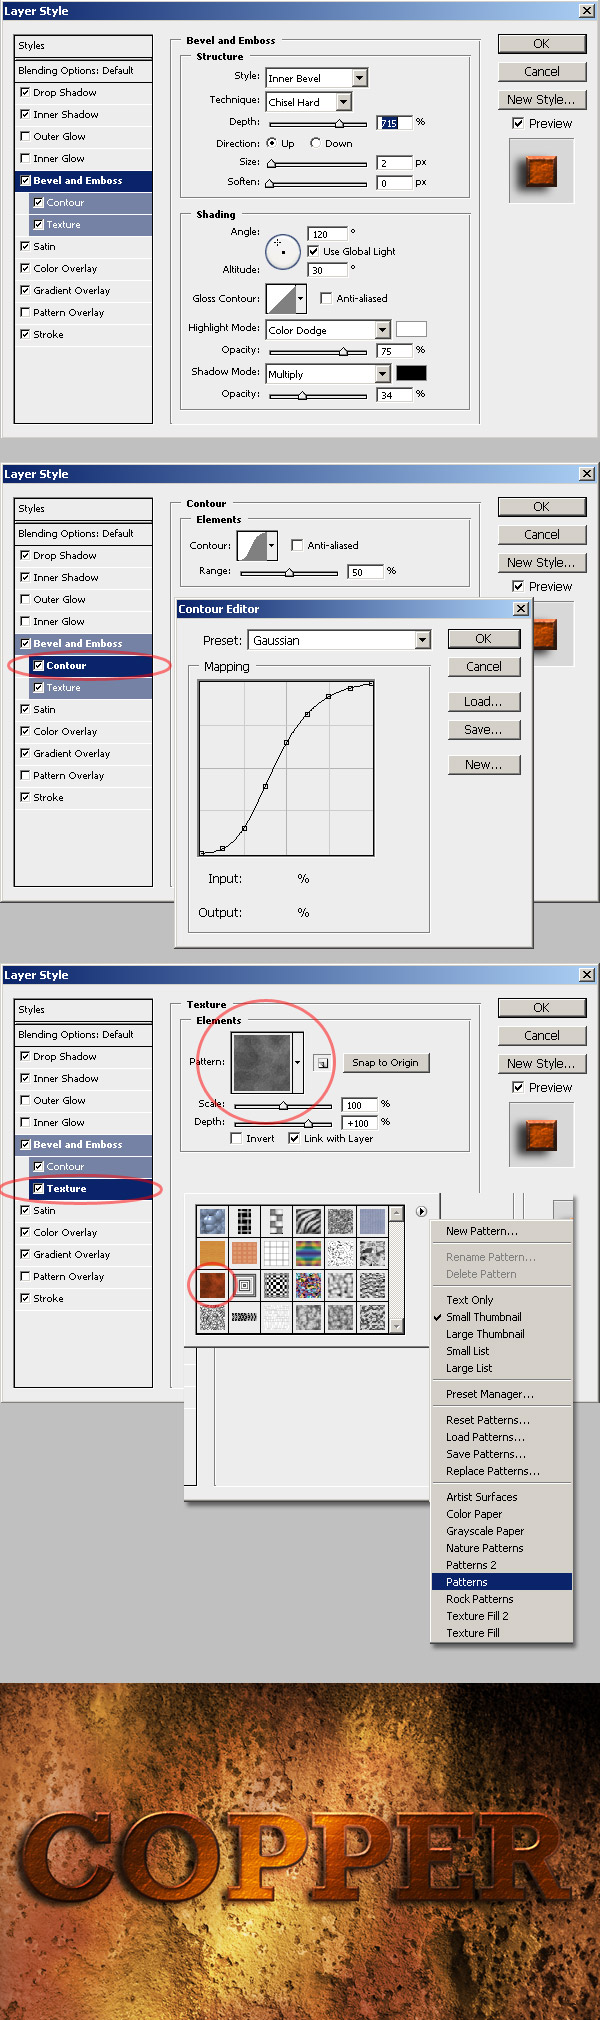
Step 11
Command-click the "Copper" layer to select the text. Go to Select > Modify > Contract and set 4 pixels (the Gradient Stroke size) and hit OK.
Step 12
Create a new layer named "Inner Effects" and fill the selection with black (#000000). Then apply an Inner Glow and a Satin style, using the values shown below. Finally, set the layer's Fill value to 0%.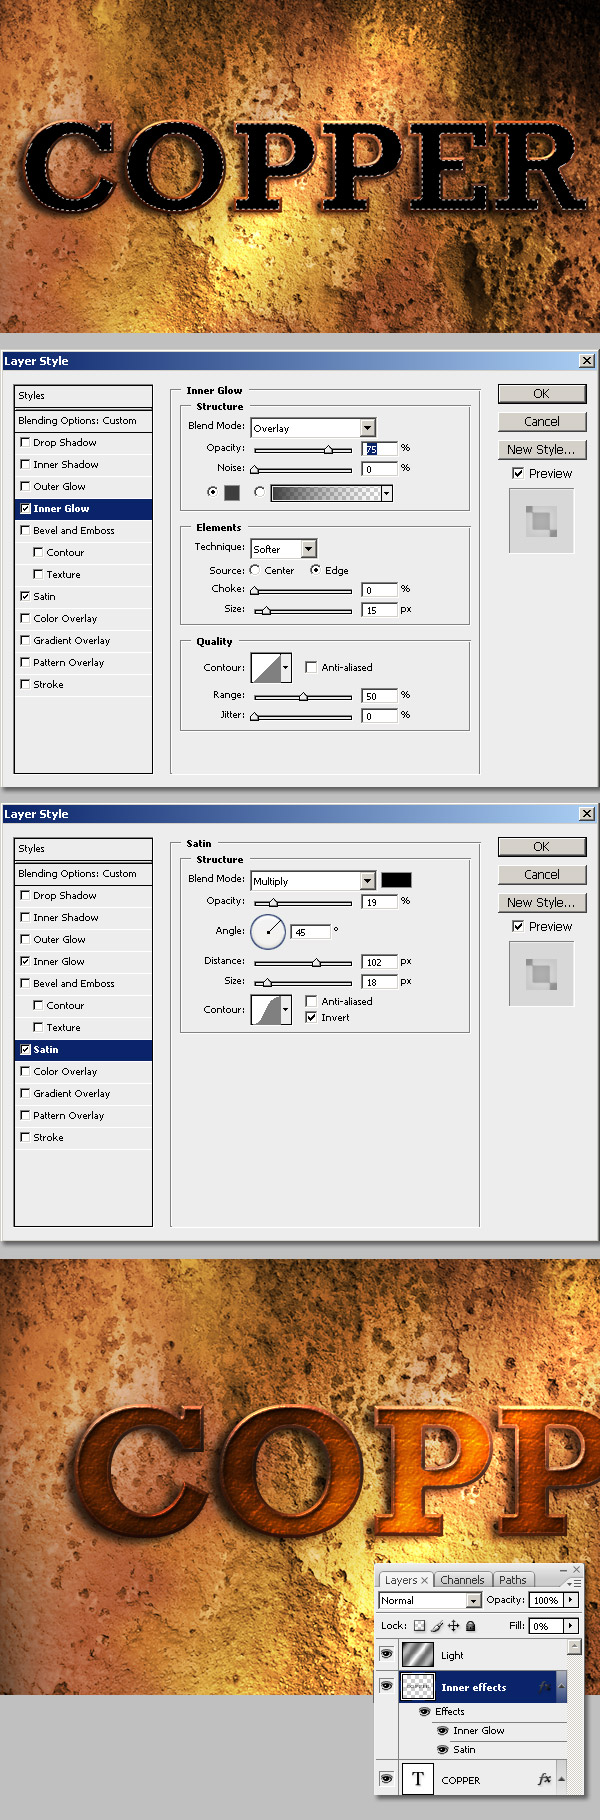
Step 13
Duplicate the "Copper" layer and name the copy "Text shadow," then delete or hide all the layer styles and go to Layer > Rasterize > Type. Put the copy below the "Copper" layer in the layers palette, then hide the styled text layer for a now. Apply a Filter > Blur > Motion Blur to the "Text shadow" layer. Finally, show the "Copper" layer again, select the "Text shadow" layer and delete all the top and right extra shadows.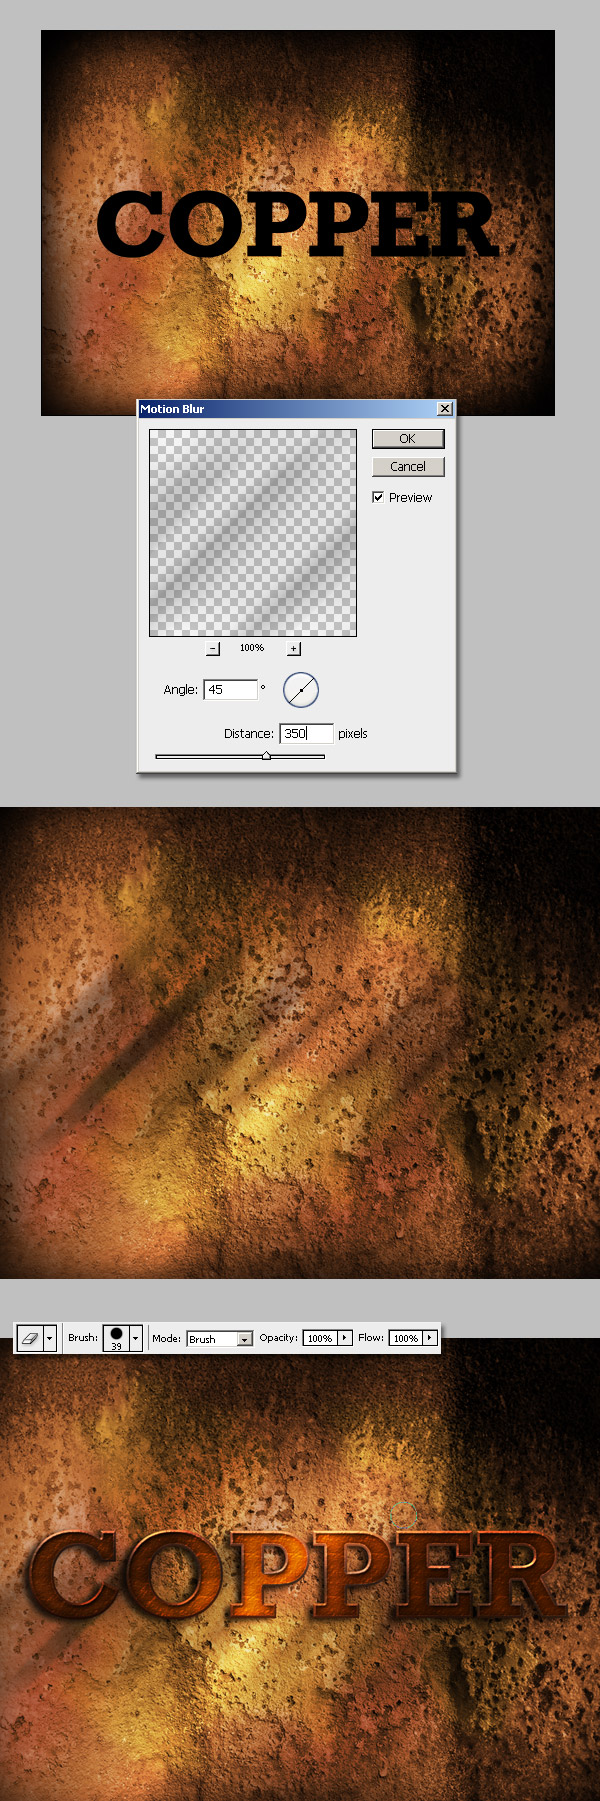
Step 14
Let's add some light rays. Using the Rectangle Tool draw four or five parallel rectangles above the "Light" layer. Merge them and Command-click the corners to distort them, as shown below. Next, apply a Gaussian Blur (10px radius). Finally, change the "Light stripes" layer's Blending mode to Overlay and set the layer Opacity to 50%.
Step 15
Command-click the "Light stripes" layer miniature, then select the "Text Shadow" layer and delete the selection.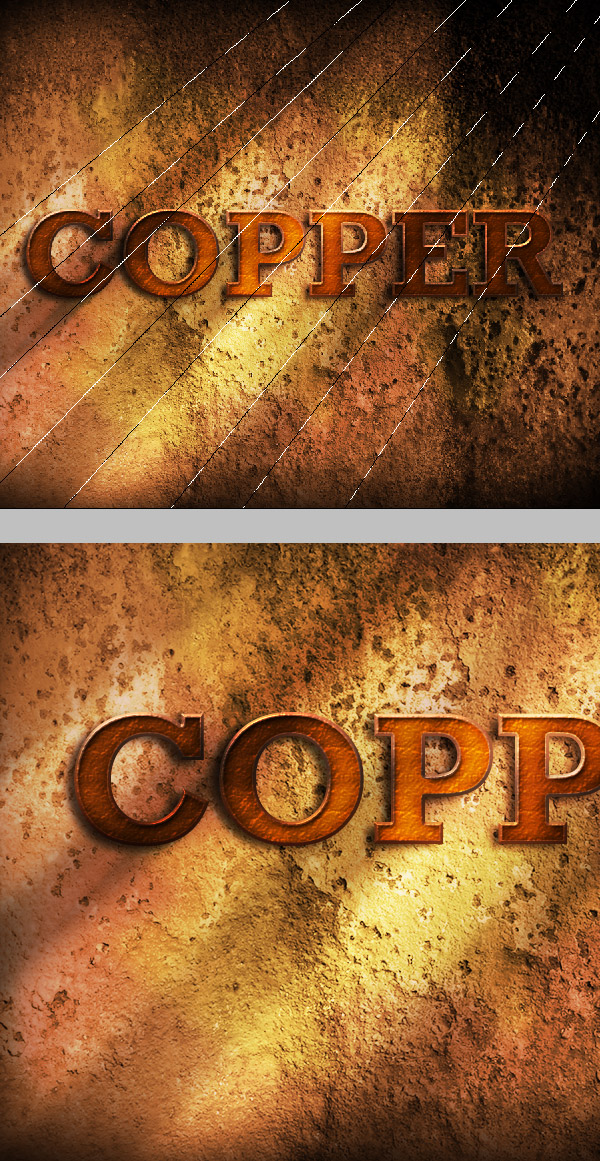
Step 16
Just to improve the lighting, Command-click the "Copper" layer one more time, but this time fill the selection with a White to Black (#FFFFFF to #000000) Reflected Gradient into a new layer just below the "Light" layer. Finally, change the Blending Mode to Overlay and Opacity to 25%.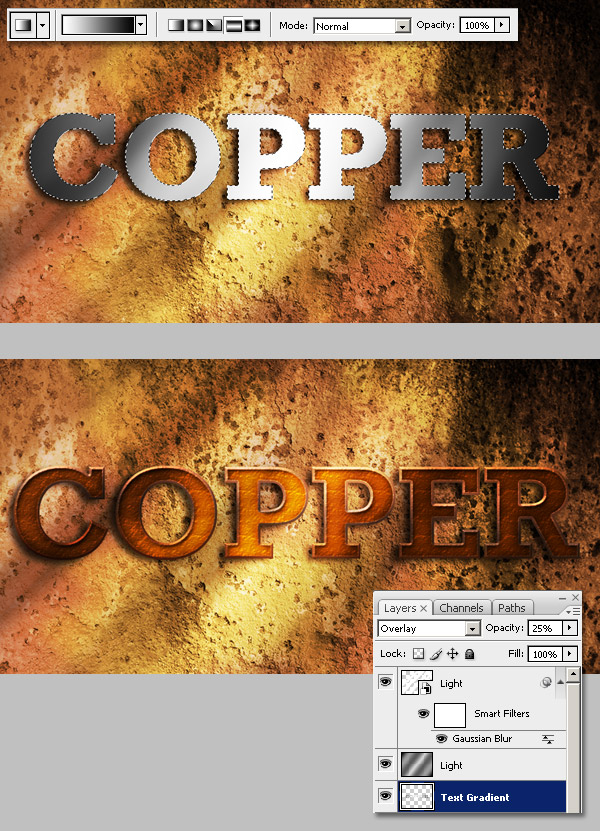
Step 17
As a final detail, add a texture layer above everything else, in this case I'm adding this old paper sheet changing its Blending Mode to Multiply and it Opacity to 50%.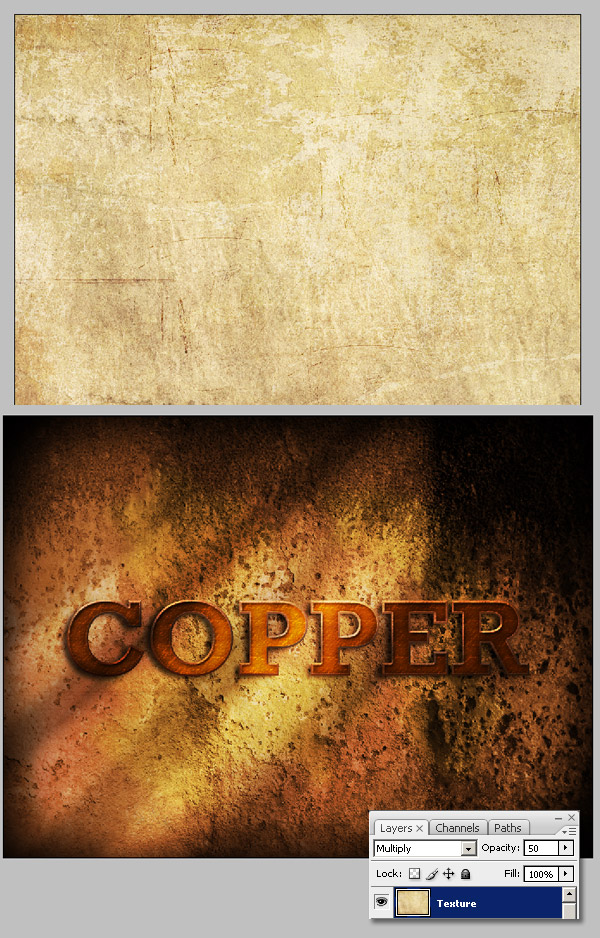
Step 18
A final tip, as this layer effect is ready to copy and paste in the PLUS file, you can use it on different typefaces or shapes. If you want to apply this effect onto a small object, it is better to create a big size text or shape first and convert it into a Smart Object before resizing it. This way you'll preserve the aspect ratio of the effect.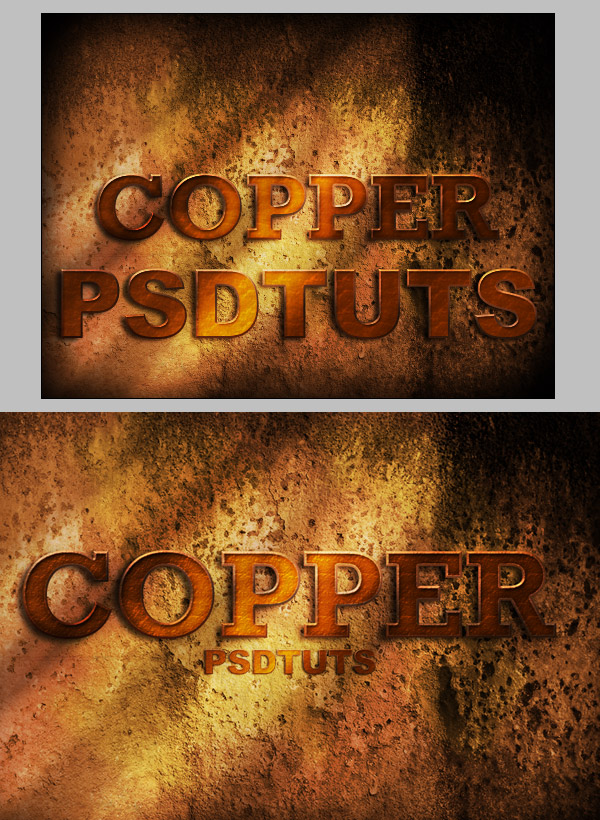
Conclusion
I hope you find this effect useful. Now it's up to you experiment with the layer styles, or download the PSD file from PSDTUTS PLUS and copy the layer effect if you want to save time. You can view the final image below or view a larger version here.


0 Comments::
Post a Comment