Last week we lost Michael Jackson, a true legend and without any doubt, an inspiration to a whole generation. I grew up listening to his songs and of course, was amazed by his movie clips and dance moves. The moonwalk was something I always wanted to learn how to do and even today, it still impresses me. Also the light effects were always part of the Michael Jackson's repertoire and of course, have influenced a lot in my style.
In this tutorial I will show you how I created the wallpaper in tribute to the king of pop.Step 1
Open Photoshop and create a new document, for the canvas size I used 1920x1200 pixels.
Step 2
Apply a Layer Style to the background layer, use Gradient Overlay. Use Radial for the Style and for the Colors use #101213 and #253239 for the colors. Also increase the Scale to 141%.
Step 3
Let's use an image of the King of Pop... I got this one from the http://www.mjjpictures.com/main.html it's the famous leaning move. With the Pen Tool (P) or Polygonal Lasso Tool (L) extract MJ from the background.
Step 4
Position MJ in the center of the document and then go to Filter>Blur>Gaussian Blur. Use 2.0 for the Radius.
Step 5
Now go to Image>Adjustments>Hue and Saturation. Reduce the Saturation to -100. After that go to Image>Adjustments>Levels. Increase the Black Input to 140 e the white to 212.
Step 6
With the Ellipse Tool (U) create an ellipse like the image below, then go to Filter>Blur>Gaussian Blur. Use 90 pixels for the Radius. Create another ellipse and repeat the Gaussian Blur, this time however, use 20 pixels for the Radius. Group these 2 ellipses and then change the Blend Mode of the group to Color Dodge.
Step 7
With the Pen Tool (P) create the spot light, then go to Filter>Blur>Gaussian Blur. Use 80 pixels for the Radius. Change the Blend Mode to Overlay than duplicate this layer 2 times. You will have 3 layers.
Step 8
With the Pen Tool (P) create another triangle like the image below just to make the light brighter towards the top and middle. Go to Filter>Blur>Gaussian Blur. Use 80 pixels for the radius. Also add another layer and then with the Brush Tool (B), use a big round brush with white for the color. Paint a spot of light at the top. After that group these 2 layers and change the Blend Mode of the group to Color Dodge.The last thing here is to add some sparks. I've written quite a few tutorials explaining how to do that you can check this out: http://abduzeedo.com/amazing-photoshop-light-effect-10-steps
Add another layer inside the group with Color Dodge and then paint some sparks like the image below.

Step 9
Add another layer on top of the others and go to Filter>Render>Clouds. Make sure you had black and white for the background and foreground colors. Then change the Blend Mode to Color Dodge. After that with the Eraser Tool (E) select a big soft brush and start deleting the layer, leave just some very small areas close to the lights.
Step 10
Select the MJ layer and change the Blend Mode to Color Dodge. Then with the Pen Tool (P) create a black triange to use as the MJ shadow. Then with the Eraser Tool (E) delete the end with a very soft brush. Also you will have to duplicate the MJ layer and change the Blend Mode to Normal then delete the rest of the layer and just leave the feet. We have to that because with the Color Dodge Blend Mode the black becomes transparent so MJ's shoes wouldn't appear.
Conclusion
Select all layers and duplicate them, then go to Layer>Merge Layers. After that go to Filter>Blur>Gaussian Blur. Use 15 pixels for the Radius and change then Blend Mode to Screen. That's it, our little tribute to the King of Pop, full of light effects and magic like his music. Now it's all about playing with the tool and creating your own version! Cheers ;)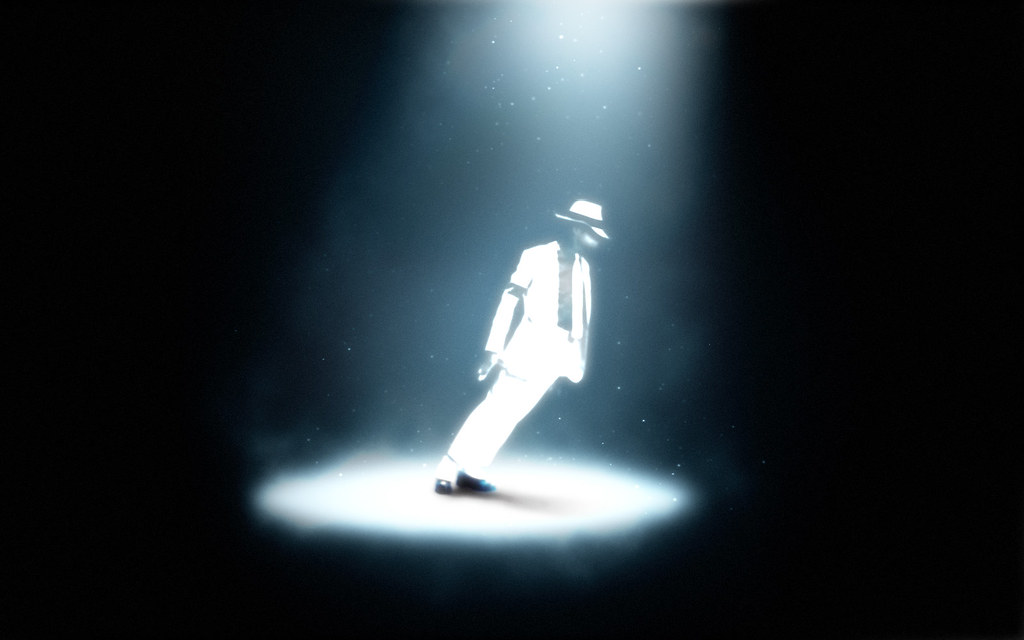


0 Comments::
Post a Comment